Home ||  Art  |  Books   Boats  | Garden | Orchard | Homestead Sew-Knit  |  Music  |  EventsBlog  ||  Contact 

 
Art

Steve...
   Bowls
      'In Progress'      
      Photo Archive
      

   Instruments
   Spoons
   Bio

Sue...
   Watercolors
   Fingerweaving
   Bio

How to Order

Contact Us


-  The Carving Process  -

Tools I Use for Bowl Carving
by Steve Schmeck

Over the years the two questions I have been asked most frequently are "What tools do you use (or recommend) for bowl carving?" and "How do you keep your bowls or spoons from cracking while drying?" I'll be addressing the tool questions here and soon will have a page on the bowl and spoon drying processes I use.

I have built up a decent, though modest in number, selection of gouges and other carving tools over the last 30 years or so. Here is a list of the main tools I now use when carving a bowl; in order of importance - that is, if I was starting fresh I'd get the ones at the top of the list first.

Gouges:
   #7 sweep / 35mm Long Bent Gouge
   #5 sweep / 25mm Straight Gouge
   #9 sweep / 30mm Straight Gouge
   #7 sweep / 25mm Spoon Gouge
--------
   #14 / 12mm V-Parting Tool
   #8 sweep / 18mm Long Bent Gouge
   #5 sweep / 60mm - heavy duty (I like this tool a lot)
Rasps:
   8" Half-Round Detailing File
   8" Microplanes® w/handle; Flat & Round   
   8" 4-In-Hand Rasp

Mallet:
   18 oz. Urethane Head Mallet


 The Carving
 Process...


Over the years I have purchased many different brands of gouges trying to come up with something as good as the rather expensive PFEIL "Swiss Made" tools sold by Woodcraft Supply. I ended up with quite a few tools which in one way or another just don't measure up. Either their balance or 'feel' is off, or they don't hold an edge or they for some reason just don't cut well, no matter how I modify their edge shape or profile. Bottom line; if you are serious and can afford them I'd get the 'Swiss Made' gouges. I'd stick to their main line - as opposed the the intermediate grade tools as bowl carving requires some heft and strength in the tools.

I bought my tools over many years (at 70's, 80's & 90's prices) and they have served me well. Of course you wouldn't need to get all the tools at once and you may well decide your style of carving would head you in the direction, for instance, of smaller or stouter tools. Probably the best advice I can give you is...start slow and add as you find a specific need.

 Carving Bench


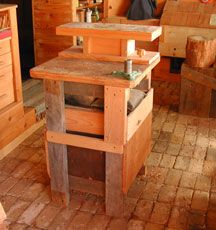
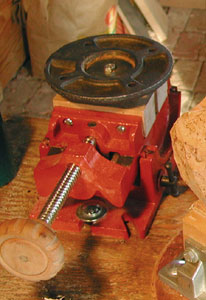
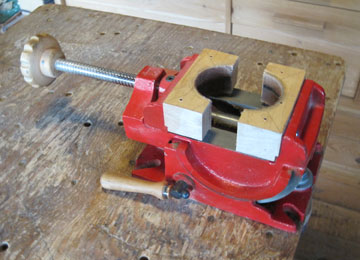
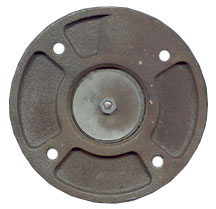
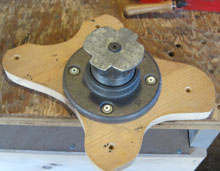
As you may have noticed I use a couple of securing devices including a cool Rotating & Tilting Vise. Here is a photo of my carving bench. It is made from rough 2x4's with plywood gussets and the base is filled with four concrete blocks for stability. The top is two layers of 5/8" plywood laminated (glued) together. On top is a 'riser bench' which I frequently bolt to the main bench to get the work up to a better working height.
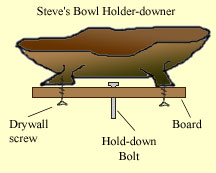
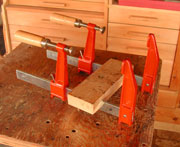
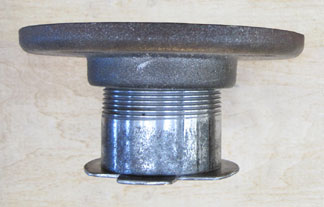
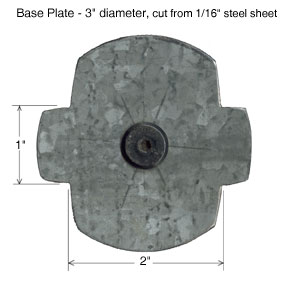


I nearly always use a version of the system shown below for 
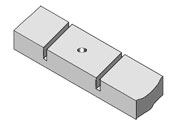
securing the roughed out bowls to the bench.

bowl Holder-Downer
After flattening what will be the bottom of the bowl blank, I determine the location of the feet or base and using a 'china marker', draw an oversized shape of the individual feet. I pre-drill 3/32" holes in the bottom of the 'feet' to prevent stressing the wood there. The trick to accurately locating the holes in the board (often a plywood scrap) is to 1) turn the bowl bottom up; 2) at each spot on the bottom of the foot where it is safe to put a screw, I tap in a 1/2" #18 brad with 1/4" left protruding; 3) turn the bowl over and press it (the brads) down on the board to mark the hole locations; 4) remove the brads and drill the 3/32" pilot holes in the brad holes; and finally, 5) drill slightly oversize holes in the base board for the drywall screws and countersink them from the bottom. The Hold-down bolt goes through one of several holes drilled in the top of the riser bench or directly through the carving bench.


Rough-out Clamp Assembly...

Here you can see how I've rigged a simple block with two grooves in it to secure large log sections for roughing-out...
 

Clamps w/ block  Clamp-Block 

The grooved block holds the heavy-duty (5" deep) adjustable clamps upright. A bolt through the  block holds the pair of clamps tightly to the carving bench. I usually place a spacer board (not shown) beneath the tails of the clamp's beams to facilitate adjusting clamp pressure without having to loosen the bolt.


And last but not least, my current favorite vise for working on carvings...
 

Tilting vise


This vise has worked great! It has proved to be super-strong, quiet (no rattles) and easy and quick to use.

With a quarter-turn of the round knob the work can be rotated 360 degrees and with another quick turn, locked securely. A flip of the tilt-locking lever and the vise can be tilted from horizontal to nearly vertical. When tilted the bowl hangs out over the edge of the bench and I can easily access the back/bottom of a carving.

Below I've described the fairly straight-forward modifications I've made to this vise.


Here is how I modified this heavy-duty vise to work for sculpture and carving.
 

Here is what the vise looks like as it comes from the factory. I got my vise from Stewart-MacDonald  their product #1820, now (9/2020) costs about $79.


Handles - One of the first things I did was replace the original metal handles with the round maple knob and maple locking lever handle shown at left. Although not strictly necessary, I like the feel of the wood better than the metal parts. The vice is quieter too - no rattling handles.

Vice Faces -I made up the maple faces by first drilling a hole slightly larger* than the outside diameter of the pipe nipple (next step). The block was sized and shaped to replace the original metal faces and then cut in half.

*The inside of the curved surfaces are lined with leather belting to increase holding power.


Base Assembly -At left is the rotating base assembly made up of (top-to-bottom):

- 2" Cast Iron Floor Flange
- 2" Pipe Nipple
- Fabricated Metal 'Keeper Plate'

The pipe nipple, which was 4" long, was screwed tightly into the flange; the threads were coated with epoxy (JB-Weld) to ensure tightness. I then cut the pipe to length to match vise face block thickness. I also polished the pipe up a bit with sandpaper to keep it turning smoothly without abrading the leather jaw liner material.

The metal base or 'Keeper' plate is shaped to allow the rotating unit to be removed when the  unit is carefully aligned with the opened vice faces.

Its main function is to keep the base unit from lifting or falling out of the vise. This is especially important when the vise is tilted.

A flat-headed bolt goes from bottom to top where it is secured by a large fender washer and nut.


Sub-Base - In use, I usually make up a sub-base board to create a solid, flat surface to fasten the bowl blank to. (Refer to the 'Bowl Holder-Downer' above) The outer holes in the 'wings' in the photo align with the bottoms of the four 'feet' of the bowl. The rotating base unit is fastened to the sub-base with 1" #10 screws.


Updated 09/17/2020

     Home ||  Art  |  Books   Boats  | Garden | Orchard | Homestead Sewing  |  Music  |  EventsBlog  ||  Contact