Home  ||  Art  |  Books |  Dance  |  Garden  | Homestead |  Music | Recumbents | Schedule |  Violins  ||  Contact 

 
Art

Steve...
   Bowls
      'In Progress'      
      Photo Archive
      

   Instruments
   Spoons
   Bio

Sue...
   Watercolors
   Fingerweaving
   Boxes
   Bio

How to Order

Contact Us


Stewart-MacDonald Tools & Tool Ideas
by Steve Schmeck

First, an idea for a new tool I'd like to see someone make.

Here is what I used on my most recent re-fret job to level and give preliminary shape to the fret ends:


Your basic triangular file with painter's tape protecting the edges - leaving an effective, safe cutting surface preventing damage to the edges of the fingerboard.

Here is a drawing of the proposed tool:

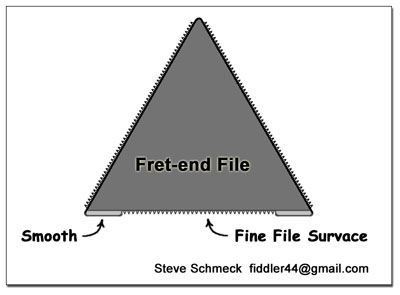
Stewart MacDonald, please make these! Thanks.
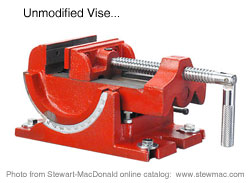
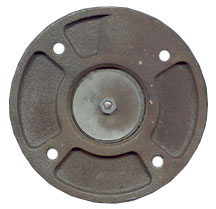


And on another subject, this is my current favorite vise for working on carvings...
 

Tilting vise


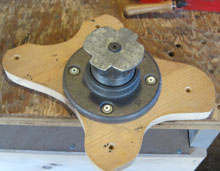
This vise has worked great! It has proved to be super-strong, quiet (no rattles) and easy and quick to use.

With a quarter-turn of the round knob the work can be rotated 360 degrees and with another quick turn, locked securely. A flip of the tilt-locking lever and the vise can be tilted from horizontal to nearly vertical. When tilted the bowl hangs out over the edge of the bench and I can easily access the back/bottom of a carving.
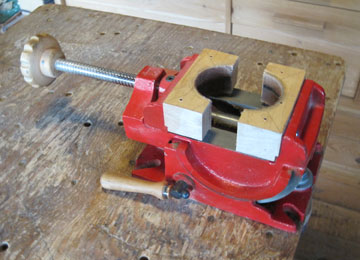
Below I've described the fairly straight-forward modifications I've made to this vise.


 The Carving
 Process...


Here is how I modified this heavy-duty vise to work for sculpture and carving.
 

Here is what the vise looks like as it comes from the factory. I got my vise from Stewart-MacDonald (www.stewmac.com); their product #1820, now (2012) costs about $65.


Handles - One of the first things I did was replace the original metal handles with the round maple knob and maple locking lever handle shown at left. Although not strictly necessary, I like the feel of the wood better than the metal parts. The vice is quieter too - no rattling handles.

Vice Faces -I made up the maple faces by first drilling a hole slightly larger* than the outside diameter of the pipe nipple (next step). The block was sized and shaped to replace the original metal faces and then cut in half.

*The inside of the curved surfaces are lined with leather belting to increase holding power.


Base Assembly -At left is the rotating base assembly made up of (top-to-bottom):

- 2" Cast Iron Floor Flange
- 2" Pipe Nipple
- Fabricated Metal 'Keeper Plate'

The pipe nipple, which was 4" long, was screwed tightly into the flange; the threads were coated with epoxy (JB-Weld) to ensure tightness. I then cut the pipe to length to match vise face block thickness. I also polished the pipe up a bit with sandpaper to keep it turning smoothly without abrading the leather jaw liner material.

The metal base or 'Keeper' plate is shaped to allow the rotating unit to be removed when the  unit is carefully aligned with the opened vice faces.

Its main function is to keep the base unit from lifting or falling out of the vise. This is especially important when the vise is tilted.

A flat-headed bolt goes from bottom to top where it is secured by a large fender washer and nut.


Sub-Base - In use, I usually make up a sub-base board to create a solid, flat surface to fasten the bowl blank to. The outer holes in the 'wings' in the photo align with the bottoms of the four 'feet' of the bowl. The rotating base unit is fastened to the sub-base with 1" #10 screws.


Updated 10/24/2012

     Home  ||  Art  |  Books |  Dance  |  Garden  | Homestead |  Music | Recumbents | Schedule |  Violins  ||  Contact