|
| |||||||||||||
|
|
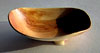
8" x 5-1/2" x 2-1/2" February 2005
|
|
|||||||||||
|
|
|||||||||||||
|
|||||||||||||
|
This bowl is in the permanent collection of the Bay College Besse
Center Gallery, Escanaba, Michigan. |
|||||||||||||
|
| |||||||||||||
|
|
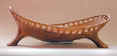
8" x 5-1/2" x 2-1/2" February 2005
|
|
|||||||||||
|
|
|||||||||||||
|
|||||||||||||
|
This bowl is in the permanent collection of the Bay College Besse
Center Gallery, Escanaba, Michigan. |
|||||||||||||