I wrote
the following in
2003
for
Countryside Magazine -- How our lives and habits do change!
And sometimes not.
LESSEN THE HEATING AREA -- Though our house isn’t large, we found we could
save some firewood by blocking off the back third of the area. Because of the
open design of our place, we can’t just close a door to shut off a room.
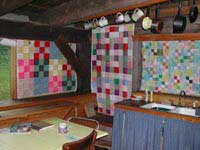
Instead, I would wash a pile of the best looking of the "garden
blankets" and hang them behind the living room wall and across the open
areas between the "front" rooms (living, office/library, kitchen, and
shop) and the "back" rooms (bedroom, bathroom, storage room). We also
put up a temporary, simple framed quilt covered door in an opening so we could
easily get back and forth. For many people it is a simpler matter to shut off a
few rooms.
Though we assist our wood heat with two large solar heating panels on the
front of the house, our main source of winter heat is our wood heating stove
(plus the wood cookstove). These heating sources are in the front part of the
house, so by blocking off the back, we kept much of the heat in front where we
spend most of our time.
 While it did get cool in the back rooms, they weren’t so cut off that it was
freezing back there. However, it was cool enough that we preferred to move our
bed from the back bedroom to the living room. We used to simply make up the bed
on the floor. Then Steve rebuilt our homemade couch so it could turn into a bed
in a few minutes, thus becoming both bed and couch for the winter. It was a cozy
and comfortable arrangement. While it did get cool in the back rooms, they weren’t so cut off that it was
freezing back there. However, it was cool enough that we preferred to move our
bed from the back bedroom to the living room. We used to simply make up the bed
on the floor. Then Steve rebuilt our homemade couch so it could turn into a bed
in a few minutes, thus becoming both bed and couch for the winter. It was a cozy
and comfortable arrangement.
An hour or so spent reorganizing our living space resulted in the savings of
heating fuel. All it took was a willingness to look at the living areas from a
different perspective, and play around with the possibilities.
I enjoyed the winter coziness of this arrangement. But when I started working
in watercolor my studio ended up in the back of the house. Though I didn't need a large
area, there simply wasn’t a convenient spot in the front. And since I do most
of my painting in the winter months, we could no longer block off the back of
the house. We do burn a bit more wood, and I miss the atmosphere of our former
compact winter arrangements. But having a painting studio for painting makes it
worthwhile.
CEILING FAN -- We make more use of fans in the winter than in the summer.
Even though our ceiling isn’t that high, the use of a ceiling fan is a great
help for winter comfort. Since hot air naturally rises, the fan sends that
warmth back down to our level. We also occasionally use a set of small fans to
direct the heat from the woodstove in a particular direction. Thus the areas we
inhabit feel warmer without additional heat.
If you have regular grid power, your choice of fans is plentiful. But since
we wanted our fans to run directly off our 12 volt battery system, Steve
assembled the fans himself. The ceiling fan is an industrial-grade computer tape
drive motor mated to a fan blade assembly from a discarded box fan.
The small fan set is a small rack of three old computer power supply fans,
screwed to a base and wired with a switch and cord. We use similar fans in the
greenhouse where they help keep things healthy by keeping the air circulating
with very little use of power.
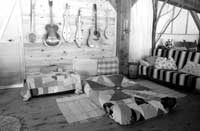
 WINDOW QUILTS -- These are in place year round so there really isn’t anything
to do here to get ready (except for occasionally taking them down to wash them).
When it is significantly colder outside than inside, we drop the roll-down
hand-made window quilts at night. And when it is REALLY cold outside during the
day (low sub zero’s), we leave most of them down during the day as well. On
some windows, they also get used in the heat of summer (which is somewhat rare
in our neck of the woods) to keep the sun and heat out. The difference the
window quilts make is easily noticeable. WINDOW QUILTS -- These are in place year round so there really isn’t anything
to do here to get ready (except for occasionally taking them down to wash them).
When it is significantly colder outside than inside, we drop the roll-down
hand-made window quilts at night. And when it is REALLY cold outside during the
day (low sub zero’s), we leave most of them down during the day as well. On
some windows, they also get used in the heat of summer (which is somewhat rare
in our neck of the woods) to keep the sun and heat out. The difference the
window quilts make is easily noticeable.
*(See separate article on making
window quilts.)*
OUTDOOR CHORES -- There are always many more outdoor projects on the list of
"things to do before winter" than there are hours in the shortening
days, but a few do manage to get done every year . . .
 WINTER SALADS -- It’s nice to have a bit of green for both palate and psyche
in the winter (and palette, too, if you are a painter!). Before the hard freezes
set in, I dig up a few plants of the hardier sort to help us through those
non-outdoor-gardening months. I transplant them into a waist-high raised bed in
our attached greenhouse. You could also plant them into a large bucket or pot
(with drain holes) and set them in the sunniest spot in your house. Experience
will tell you what works best in your environment. I usually bring in hardy
greens such as parsley, swiss chard, celery, herbs, and a flower or two. Since
my greenhouse is unheated, I have to stick with the cold hardy plants. But if
you have a warmer area, you could expand your trials to other plants such as
peppers and small tomatoes. WINTER SALADS -- It’s nice to have a bit of green for both palate and psyche
in the winter (and palette, too, if you are a painter!). Before the hard freezes
set in, I dig up a few plants of the hardier sort to help us through those
non-outdoor-gardening months. I transplant them into a waist-high raised bed in
our attached greenhouse. You could also plant them into a large bucket or pot
(with drain holes) and set them in the sunniest spot in your house. Experience
will tell you what works best in your environment. I usually bring in hardy
greens such as parsley, swiss chard, celery, herbs, and a flower or two. Since
my greenhouse is unheated, I have to stick with the cold hardy plants. But if
you have a warmer area, you could expand your trials to other plants such as
peppers and small tomatoes.
I usually also plant some lettuce and other salad greens the end of August
just for the greenhouse. Planting needs to be timed so the plants will be pretty
much full size before the cold weather and short days set in. Transplanted into
pots or flats (or the bed) these supplement the other plants to provide us with
fresh salads. Even a few fresh leaves makes a lot of difference in the depth of
winter. You can also plant some later to take a flat or two of small seedlings
through the winter. They will hibernate until the longer and warmer days of
spring to provide welcome new green when things are still very brown outside.
CAT SOD -- If you have cats, and your ground is covered with snow for an extended
time, dig up a square of good grass sod to bring in for winter. Set in an old
cake pan on a sunny windowsill, this is a favored winter spot for our outdoor
loving felines (who don’t care much for snow). They will chew on the grass,
roll in the hay (so to speak), and lounge with that feline specific abandon on
this little patch of indoor sod. To say that it is a popular spot is an
understatement. You can also plant a flat of grains (wheat, rye, barley, oats)
for their winter grazing pleasure. It doesn’t stand up to much lounging, but
it does give some good, fresh feline salads which they appreciate as much as we
do ours.
CHICKEN HAY -- When we had chickens, they also relished green in the winter.
Since the regular growing kind was more than a little scarce for the many winter
months, in the fall we would buy six bales of the best, freshest, greenest
alfalfa hay that we could find. Then each month we would set a fresh bale in the
coop, minus the twine, and let the chickens have a party. They would scratch,
eat, toss, and spread the hay all over the coop. The smell was great (not
something that can usually be said of chicken coops), the chickens happy, and
the egg yolks a respectable dark yellow. It was well worth the bit of extra
money it cost.
WOOD ASHES -- If I haven’t already done so, I empty the designated
galvanized garbage can of its supply of wood ashes before the snow comes,
spreading them thinly on garden and fruit trees, in preparation for the coming
intense "wood ash making" season. Storing the ashes in a can, instead
of dumping them in a pile somewhere, allows me to put them where they can do the
most good. Where a concentration of wood ash would be harmful, a thin sprinkling
can be helpful. I never have enough for the entire garden and fruits, so I
alternate sections and trees. Fresh wood ashes are also good to put around
transplants and growing cole crops and along radish rows to prevent root maggots
from moving in.
GARDEN -- Since I have permanent, mulched beds in the garden, there isn’t
much (other than harvesting) to readying the garden for winter. I might cut down
the sturdier plants (such as broccoli, corn stalks, and asparagus) with the long
handled lopers to help the decaying process along, but mostly I let nature take
care of things. I do throw some extra mulch on the strawberries and asparagus.
Not only does this protect them if we don’t get adequate snow cover until late
(which happens occasionally), but it makes life easier in the spring. The
asparagus just comes up through the mulch, and when things start perking up I
pull the mulch off the strawberry plants. Then, with just a little weeding,
these beds are all set for the new growing season.
In early fall I plant cloves of the best bulbs of garlic, with the usual
covering of mulch. I also plant some of the best of my onion bulbs to grow seed
next year. The same with carrots and any other root crops.
I also pile mulch on a patch of late carrots that will be overwintered for
(hopefully) spring eating. It’s an iffy proposition here, but when they make
it, the eating is great.
If I don’t have extra hay stockpiled for the above purposes, I use the
mulch from the paths. They won’t miss it over winter. It does, however, mean
more weeding of the paths next spring until we get new hay mowed, raked, and
spread. The best years, I have plenty of mulch hay for everything. If you buy
your mulch hay, you can sometimes get a good deal in the fall from farmers who
don’t want to store the hay over winter, or if it was rained on. Make sure
they know you are using it for mulch, and that you don’t want hay with
maturing seed heads.
WOOL SKIRT -- For those never-ending (it seems) "quick" trips
outside for this or that in the winter, that tend to end up longer than shorter,
a long, wool wrap skirt can be a handy garment. It is faster and easier than
changing into long-johns or struggling into snow pants or coveralls. Though
there is no reason a man couldn’t make use of this as well, I assume women
will be more interested. I sewed mine up from scraps (this is a funky working
skirt, not a "wear to town" outfit) -- wool material on the outside,
lined with flannel inside. It’s a simple wrap around design, with generous
overlap, and a tie closure. Remember to size it to be worn over your regular
clothing. Mid-calf length works well, keeping you fairly warm yet with plenty of
striding room.
For serious outdoor work, when you need to be agile, pants with long-johns
under or coveralls or snowpants over are better. But for the quick and dirty,
the skirt is great. This was my solution to our half mile walk to the car in the
winter. Since I didn’t have snowpants, it was either be cold and not enjoy the
walk, or be warm and wear long-johns. Then, either keep the long-johns on at the
other end of the trip (usually uncomfortably warm), or do the gymnastics
required to take them off in our (rather small) car. It may not win any fashion
awards, but the wool over-skirt is much easier.
SQUASH MEATLESS STUFFING DISH -- This isn’t really in the "getting
ready for winter" vein, but it is the time of year we have winter squash to
eat. Now I’m not much for fancy dishes, or anything that takes too much
fussing or time to prepare. So I tend to come up with adaptations and meals that
are easy and are based on food we have. This is what I do with winter squash.
Cook your squash however you like (halved, or quartered, or peeled and cubed)
in the oven, or in a covered pan with a little water on top of the stove. Since
this time of year I’m cooking mainly on the wood heating stove, I usually go
with the second option.
Saute chopped onion and garlic in a little oil. Add some parsley and sage (or
whatever seasonings you like). Add a pile of sturdy bread cubes. Saute a bit
longer to toast the bread some. Stir in some yoghurt (or some water if you don’t
have or want yoghurt) to bring it all together.
Serve in the squash halves, or mix with the squash cubes. Or forget the
squash and serve as a side-dish to something else. It’s good eating.
NOW, sit back and enjoy the coming of winter. It’s worth all the
preparation.
* * * * * *
Copyright
© 2003 by Susan Robishaw
I love all
seasons of the year up here and all the variations. But fall has a special snap
to it that’s not just the frost in the air. It’s that wonderful combination
of tension and satisfaction involved in "Getting Ready for Winter".
Even when the snow comes early and the wood shed is filling at a cold snail’s
pace, it’s a great time. The adrenaline flows. There’s a lot of work to be
done, but you don’t have to make it be drudgery.
WOOD COOKSTOVE: The garden once again becomes the center of focus in the
early fall, and the wood cookstove comes into its own during canning season. For
some, this old appliance is a series of trials and tribulations. For me, it’s
a timesaver. Instead of four puny burners, you have an entire expanse of cooktop
to use for canning, with all the necessary ranges of heat (assuming you remember
to keep putting wood in). It does take attention, but it’s worth getting used
to, if you have a source for wood. We mainly use 2" - 4" branches and
poles, gathered when cutting wood for the heating stove. Stack them to dry for a
year, then saw to length on the sawbuck. If you’re shopping for a used
cookstove, make sure the grates fit and are in good working order, and that the
top of the oven hasn’t rusted through. Rust on the cooktop surface can be
sanded off.
There isn’t much to maintaining the cookstove. Occasionally I’ll take
some coarse sandpaper to the cooktop surface to clean it, then rub cooking oil
into the top. If the fire isn’t drawing well, it is likely being blocked by
accumulated soot and ash around the oven. You’ll need a small tool designed
like a hoe, which is a piece of metal just smaller than the cleanout door below
the oven, attached to a long, stiff handle. Lift out the pieces of cooktop that
are over the oven, then rake off extra ash, leaving a layer for insulation. Also
rake down the far side of the oven where soot accumulates. Then spread a good
layer of newspapers all around in front of and under the stove, and open the
small door under the oven. Carefully rake out the soot and ash onto the
newspaper. While doing this, don’t sneeze or laugh or let breezes, kids, or
pets blow through—this is very light stuff. It’s great for adding to
concrete if you’d like a mottled black color instead of gray.
CANNING: I don’t can much anymore, using mostly eating-in-season, root
cellaring, and solar food drying. And I don’t miss the time I used to spend on
that chore. But I do use my pressure canner for a batch or two of dry beans
(nice for instant dinners and on-the-road food), and as a steam canner. To use
as a steam canner, just put a few inches of water in your pressure canner and
put the lid on sans the pressure weight (or leave the pressure valve open). Just
make sure there is a good strong, steady stream of steam coming out of the valve
before you start counting your time. Beats the time and energy involved in
bringing gallons of water to boil for the water bath canner.
Steam canning is great for tomatoes and pickles, jam and fruit sauce. Over
the years I’ve come to simplify my tomato processing quite a bit, so it’s
not that much of a chore. First of all, decide tomato skins are great, so are
tomato seeds. That small decision instantly makes life a lot easier. I use one
of two methods, depending on my schedule and druthers at the time. For the
first, I pick, wash, and chop my tomatoes in the evening into an enamel or
stainless steel pot. Sometimes I’ll add a few chopped onions and peppers, some
basil, oregano, celery. Then I bring it all to a boil and simmer till soft,
usually while we’re cooking dinner or baking bread or something, making the
best use of the cookstove while it’s going. I then set the covered pot in the
pantry or root cellar where it is cooler, and let it settle over night. OR, I’ll
leave it on the stove to continue cooking down after I’m abed, if the stove it
still going and I feel there is enough liquid.
In the morning, the heavier sauce has usually settled to the bottom and I can
pour off the thinner juice to another pot. I bring both juice and sauce to
boiling and steam can them in pint jars. The canned juice is used for soup stock
and for juice when canning dry beans later.
My second method (the one I usually use) is to bring the chopped tomatoes to
boiling as above and boil/simmer for awhile, often while I’m doing something
else with the stove. Then I strain the cooked tomatoes though a collander,
ending up with good sauce and strained juice that’s not as thin as when I let
it settle. For really thick sauce, you can strain again through a clean, cloth
bag. I can both sauce and juice as above. Beats boiling for hours and hours.
You can, of course, dry your tomatoes or sauce in the solar food dryer. But
it takes a number of consecutive good sunny drying days which we usually don’t
have in the fall.
JAM: A solar oven makes jam making easy. Just chop or mash up whatever fruit
you have, and let it cook in the solar oven during the day, propping the door
open a bit to let the moisture out (or just open in up now and then when you
wander by). In the evening, finish it off on the stove and can it quickly in the
steam canner.
FRUIT SAUCE: Don’t limit your sauce buds to applesauce. Use whatever fruit
you have available. We’ve had Juneberry/raspberry/rhubarb, Strawberry/rhubarb,
Blackberry/rhubarb/apple, Sweet cherry/rhubarb, Rhubarb/apple (rhubarb is the
most reliable ‘fruit’ crop we have!), etc. Same goes for jam. We start most
mornings with a breakfast of fruit sauce (made from fresh, reconstituted dried,
or canned fruit) mixed with dry rolled oats. Add sunflower seeds, raisins, and
maple syrup. Easy and good.
GARDEN TOUR: Now is the time to take your notebook and pencil into the garden
to plan next year’s adventures. A particularly weedy bed or patch would be a
good spot for potatoes or tomatoes or broccoli, or anything you mulch heavily or
is easy to weed. Make a note of that. Pick your most weed-free spots for peas
and grains and carrots, which are harder to weed when growing. Note what worked,
what didn’t, what you need more of, what sounded good last winter but turned
out to be not so good in the reality of summer.
Find a spot to plant your garlic where it won’t be disturbed into next
year. Fall planted garlic grows larger than spring planted, and will overwinter
is most climates. Resist saving your very best bulbs to eat or for gifts—plant
them. You’ll be happy you did when next year’s harvest comes around. Push
cloves down into the soil 3"-5" apart, then cover with a blanket of
mulch.
In addition to leaving some carrots in the ground for next spring, try
potatoes as well. The original root cellaring. Cover all with a good layer of
mulch.
MULCH: Anytime is a good time to mulch your garden, and in hay country, fall
is often a good time to pick up cheap hay, particularly if it’s been a rainy
season. Spread it hither and yon over your garden. Just make sure to check with
the farmer first about the makeup of the hay. You don’t want hay full of
mature seeded weeds, which can plant weed seeds in your garden. A well mulched
garden is a happy garden--and gardener.
PERMANENT BEDS: Fall is a good time to switch over to permanent, raised beds
in your garden. All of the soil inhabitants, of all sizes, will appreciate not
having to overcome your regular beating up of them and their environment with
the tiller. And your future garden plants will glow with that appreciation.
Start by doing one last tilling. String twine every three and a half feet. If
your soil is compacted by tilling, go down every other row, where the beds will
be, with a garden fork loosening up that hardpan. Then shovel the loose top
inches of soil from the alternate aisles into the adjoining beds. Remove the
twine and rake the beds flat on top. This will give you roughly a four foot wide
bed with a two foot wide path. Mulch the entire area if you have the materials,
or just the beds if you are short, and let it all settle over the winter. Next
spring, pull the mulch back and plant.
GREEN MANURE: Any part of your garden not growing a garden crop should be
growing green manure, which is any plant material grown to be dug into the soil,
or cut and left on top, to enrich the soil. Oats can be planted quite late and
still make some growth before winter. Buckwheat is killed by frost, so is best
planted in the summer. All plant material in your garden can be considered green
manure, so when through harvesting a crop, don’t pull the plants and haul them
off to the compost bin. Leave them right where they are to feed the soil for
next year’s crop. Corn and sunflower stalks, or any sturdy tough plants, can
be chopped down with long handles pruners (or leave them for tomato or bean
stakes next year).
STOCKING UP: Even if you don’t have a half mile walk in the winter, or grow
most of your own food, stock up in the fall as if you did. Storage can be found
in even the smallest of dwellings—under the bed, shelves in a closet, under
the stairs, behind this, over that. A box in a cool room or closet can be your
root cellar. Shelves installed on an unused wall can be your pantry. Find a
regional food buying club or co-op, buy from the farmer’s market, or buy bulk
from your regular grocery store. If it’s a regional type store, you can often
order case quantities at a discounted price. Enjoy the benefits of a well
stocked larder all winter.
HEALING SALVE: I’ve found a very good healing salve for aches and pains in
the following: Chop into a can or old pot: comfrey root, horeseradish root, and
white pine bark. Cover with vegetable oil. Put in the solar oven to heat, or on
the stove in a double boiler (i.e., put your can or pot of herbs and oil in a
pan of water). Simmer for a time, then let set overnight. Strain through a a
sieve or loose woven cloth, then shave some beeswax into the oil. Proportions
are about 4:1, oil to wax. You can also add some lanolin for a creamier product.
Heat as above (in solar oven or double boiler) until wax is melted. Stir well
then pour into shallow jars. After it is cooled, if it is too hard, reheat and
add more oil or lanolin; if too soft, add more beeswax. Store in a cool spot.
RENDERING BEESWAX: If you know someone who raises bees, you might be able to
get a bucket of odds and ends of uncleaned wax. Don’t worry if it looks pretty
gunky, it’ll clean up just fine. Dump the wax into a large pot and cover with
a generous amount of water. Heat and simmer until the wax is melted. Remove from
heat. The clean wax will congeal on the surface. Some of the debris will sink to
the bottom and can be poured out with the water. Quite a bit will be on the
bottom surface of the wax. When the wax has cooled enough to be firm, but not
yet hard, cut across it with a sturdy knife and remove from the pan. Scrape off
the debris. The wax can be broken or cut into pieces and stored as is, or
reheated in a double boiler and poured into molds or other containers. The
original melting pot can be wiped clean with old rags while still warm, or
reheat to clean.
* * * * * *
Copyright
© 2002-2003 by Susan Robishaw
|

 Three
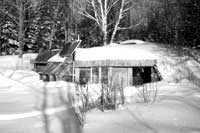
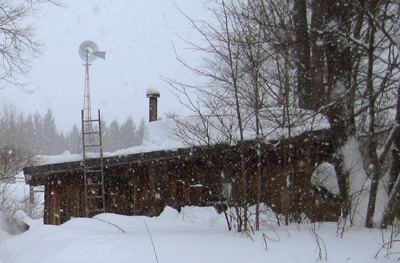
feet and rising. We weren't going to shovel off the roof of the
cabin/shop this year; haven't had to even consider it for years. Then
came this multi-day storm - another foot on top of a generous two feet
already there (and it hasn't stopped yet). Steve got out the shovel. No
use taking a chance on venerable, and well loved, 40 yr old building on
very marginal (as in rotting) cedar post foundation, and too flat a roof
for snow country. For various reasons this time he had to go at it by
himself. So easy does it, take a break or two, and 2/3 of the roof snow
is on the ground before you know it. Well, sort of. Ahh, the building
says.
Three
feet and rising. We weren't going to shovel off the roof of the
cabin/shop this year; haven't had to even consider it for years. Then
came this multi-day storm - another foot on top of a generous two feet
already there (and it hasn't stopped yet). Steve got out the shovel. No
use taking a chance on venerable, and well loved, 40 yr old building on
very marginal (as in rotting) cedar post foundation, and too flat a roof
for snow country. For various reasons this time he had to go at it by
himself. So easy does it, take a break or two, and 2/3 of the roof snow
is on the ground before you know it. Well, sort of. Ahh, the building
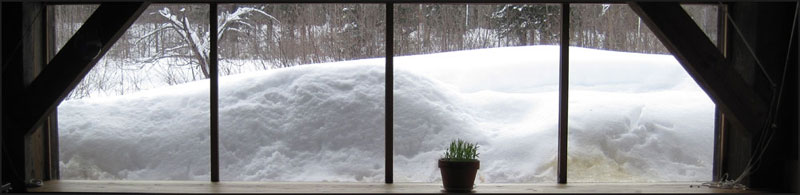
says. It
truly has been decades since we've had three feet of snow, and plenty of
blowing and drifting to go with it. A bit of a challenge in some ways
but great insulation, on the house and the trees and plants. And it
really is beautiful and amazing. What a change from last year with
record lack of snow. Thankfully the house was designed and built to
handle the snowload, as was our woodshed. Winter isn't over and neither
is the snow. We are doubly thankful this year for those who do a great
job of plowing and keeping the roads clear so we can travel. And we're
also glad that we don't have to do it every day! Though we didn't think
much about it all those years when we did. A part of enjoying where you
are.
It
truly has been decades since we've had three feet of snow, and plenty of
blowing and drifting to go with it. A bit of a challenge in some ways
but great insulation, on the house and the trees and plants. And it
really is beautiful and amazing. What a change from last year with
record lack of snow. Thankfully the house was designed and built to
handle the snowload, as was our woodshed. Winter isn't over and neither
is the snow. We are doubly thankful this year for those who do a great
job of plowing and keeping the roads clear so we can travel. And we're
also glad that we don't have to do it every day! Though we didn't think
much about it all those years when we did. A part of enjoying where you
are.