The Tabletop Mini WorkBench to the rescue. I don’t remember the original problem
that our first nailed-together scrap-board “temporary” riser solved, but it had
been around in various and changing adaptations for years. It was more or less
adequate and got a lot of use. But it always seemed to need to be shorter,
taller, longer, sturdier -- to want different clamps, holes, options -- and too
often needed by both of us at the same time.
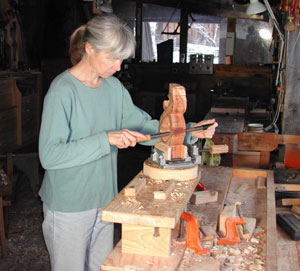
Then one winter some years back, Steve decided to make me something special for
Christmas. Living with a make-do, homesteading woodworker has great advantages
when it comes to gifts! We don’t always exchange gifts at Christmas, but the
homemade ones are the most memorable. And that year I happily received my own,
super stock Mini Riser Bench, with a custom modified vise to go with it.
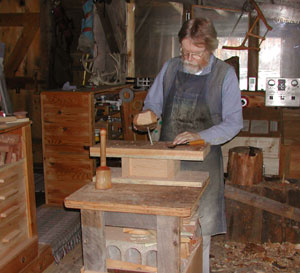
As we have different woodworking goals, and our respective main workbenches are
different heights, Steve went on to make several more custom risers to fit his
own bowl carving needs. All see a lot of sawdust, yet are easy to store on end,
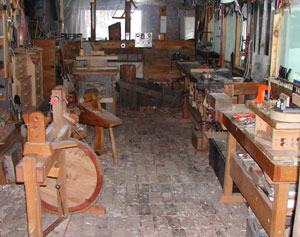
not taking up much space, when not in use. This is important in a two person
shop that is only 10 x 23 feet. Though it doesn’t have the usual large power
tools, being a hand tool shop and located in the front part of our open design
house, it does manage to hold three workbenches, two shaving horses, chopping
blocks, and a treadle lathe. Not to mention two woodworkers. Any additions have
to fit in the limited space. And the mini-benches do.
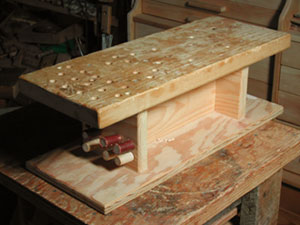
The mini-bench (MB) is easily clamped onto any of the workbenches, or to a
table, ready to use and just as easily removed, leaving the regular bench top
free. Ours are geared for the work we do -- handcarved spoons, boxes, carved
bowls, jewelry, sculpture, musical instruments -- as well as a hundred and one
other non-woodworking projects. My MB has more dog holes for my work, Steve’s
has custom holes for his bowl carving jigs and hold-downs. The basic design is
the same and can be customized for your own needs. This is a real workhorse
tool.
MATERIALS: The materials used to build our mini-benches were based on what we
had on hand rather than on any particular wood requirements -- mostly pine which
has the advantage of being easily worked. Softwood for the top has pros and
cons. It does dent and mar easily, but it also is less likely to dent or mar the
work as hardwood might. You will want a wood and a thickness that won't warp and
will stand up to whatever you use it for.
DIMENSIONS: The dimensions of my mini-bench are:
Top -- 9" x 24" x 1 1/2" pine
Bottom -- 9" x 23" x 5/8" plywood
Trestle -- 6 1/2" deep x 14" long x 6" tall of 1" pine
The terms top and bottom are interchangeable, as the bench can be set down
either way.
Steve’s main MB is similar but the dimensions are: Top -- 10" x 23" x 2" pine;
Bottom -- 9 1/2" x 22" x 1" pine; Trestle -- 6" deep x 11" long x 4 1/2" tall of
1 1/2" pine . His has one set of holes in the “top” and a different set in the
“bottom” to accommodate different jigs.
CONSTRUCTION: The basic construction is simple. An “H” trestle is made of a
board with two ends glued and screwed on. Then the top and bottom boards are
glued and screwed (screw heads recessed) to the trestle. The size of the boards
used is based on the final size wanted for the mini-bench.
But the magic is in the details, and the detailing. Following are some
considerations and options.
TRESTLE: Figure the final height you would like your work top to be. Subtract
the height of the workbench or table the MB will be clamped to, minus the
thickness of the bottom and top boards used for the MB, and this is the height
your trestle needs to be.
I wanted a working height of 39". My workbench is 31" high, and the top and
bottom boards of my MB equal about 2", so the trestle of my MB is 6" tall.
Another consideration is clamp handle room. The 6" of space between the top and
bottom boards of my MB is just enough for the shortened Jorgenson bar clamps we
have. But Steve’s MB ended up with only 4 1/2". While a small C-clamp would fit,
the bar clamp handle wouldn't even begin to fit. It is often nice to have the
clamp handle down instead of up in your way when you are working.
Our solution was to cut an inch off the wooden handle of the bar clamp. Scrape
off the varnish and flute the remaining handle stub for a better grip since you
don’t have a lot of room to get your hand around it. The fluting works well for
any of these smooth, varnished wooden handled clamps. It makes a world of
difference in comfort and ease of use.
The trestle needs to be large enough to give adequate support for heavy duty
work, yet small enough to allow enough top overhang for clamps.
Cut a two or three inch notch in the top center of the trestle center board
before assembling. Or drill a large hole. This enables you to thread a strap
clamp through to hold down an odd shaped piece.
Drill appropriately sized holes at a slight downward angle in one of the trestle
ends before assembly to store your dowel-dogs. Steve made a half dozen dogs from
3/4 inch dowel, turning the bottom halves down to a little less than half inch.
Some of the dowel-dogs have a strip of leather glued around the tops. This is
nice for use with soft or delicate pieces.
TOP: Drill numerous holes for dogs, clamps, vices, jigs, whatever else you can
think of. Holes can be drilled later as needed, but it’s nice to start with a
good variety. And it’s easier to drill the top board with a drill press before
assembly, especially if it is particularly thick or of hardwood. Most of the
holes on my bench are at one end, leaving the other end mostly solid, which
works out well for different work.
BOTTOM: You can drill one or two holes in the bottom board to bolt the MB down
instead of clamping it. I prefer to clamp, while Steve uses a bolt in the center
of his which lines up with an appropriate hole in his sculpture bench to attach
his MB. When he’s carving a large bowl he needs that extra clamping support.
BENCH TOP OPTIONS:
* Dogs and Holdfasts: See dowel-dogs below. You can also easily make tapered
dogs with a spokeshave or knife. Holes for dogs and holdfasts are spaced
randomly about 1 1/2" apart across one half of my bench.
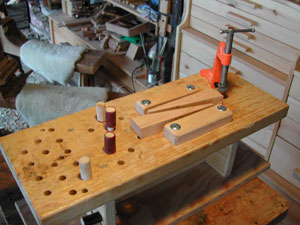 *
Wedge Clamp: Two 1" thick, 1 1/2" x 6" hardwood pieces with carriage bolts at
either end can be set in holes in the bench top to space pieces about 3" apart
(see photo). Saw several pairs of different width, long, hardwood wedges to be
used to wedge work between the pieces. This is a simple clamp that works well
for holding odd shaped work. As with most of this project, the size of your
wedge clamp will depend on what size and type of work you will be doing. Find a
secure spot to store your wedges and make extra, so you’ll have at least a few
around when you want to use the clamp.
*
Wedge Clamp: Two 1" thick, 1 1/2" x 6" hardwood pieces with carriage bolts at
either end can be set in holes in the bench top to space pieces about 3" apart
(see photo). Saw several pairs of different width, long, hardwood wedges to be
used to wedge work between the pieces. This is a simple clamp that works well
for holding odd shaped work. As with most of this project, the size of your
wedge clamp will depend on what size and type of work you will be doing. Find a
secure spot to store your wedges and make extra, so you’ll have at least a few
around when you want to use the clamp.
* Bench Top Clamp (orange clamp above photo): I’ve found a Jorgenson 3" bench
top clamp to be quite handy on the mini-bench. I have several semi-permanently
installed bolts for this clamp in both the MB top and my regular bench top, one
positioned conveniently to clamp the back of the MB down to the bench top. The
bolt is set just tight enough to hold the clamp, but loose enough that the clamp
can be easily removed. The bolt then slips down just below the surface of the
benchtop in a recessed hole when not in use. It is easy to reach under the bench
and push it up for use.
* Shop Made Jigs: Infinite possibilities here. Drill, adapt, and create for
whatever your needs or desires require.
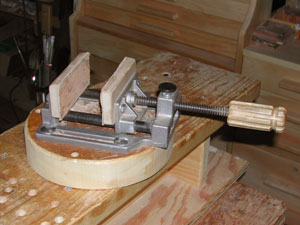
* Modified Bench Vise (see photo): A wonderful adaptation with or without the
mini-bench, this modified tool gets top honors from me. An inexpensive
quick-release bench vice was purchased. The hold down clamp was sawn off.
Leather-covered wooden jaws were bolted to the jaw faces. The cheap plastic
handle on the threaded quick-release rod was replaced with a comfortable large,
fluted, wooden handle, turning this into a very nice tool.
A circular base was made of 1 3/4" x 8 1/2" pine. A hole for bolting the base to
the bench is drilled in the center, with recesses for both the bolt head on the
top and a nut on the bottom to keep the bolt attached to the base. This will
prevent having to open the vice jaws to push the bolt down every time you
install it. Make sure your bolt is long enough to go through the base and the
bench top with room for a comfortably large wing nut on the bottom.
You can drill holes around the perimeter to line up with holes in the bench top
for bolt or dowel to keep the vise from rotating. Several holes allow you to
rotate the vise as you work.
This traveling vise can be used anywhere it can be bolted or clamped. When not
in use it can be stored on a shelf.
 Like
many woodworkers and do-it-yourselfers, our workplace is full of handmade tools
and jigs. They have soul that is starkly missing in factory made tools and
accessories; assuming the item can be found for purchase at all, which it often
can’t. It is amazing what even a little bit of handwork on a store bought tool
will do for the feel of an item, both physically and psychologically. The proof
is in their use. And our mini-benches, with or without the bells and whistles,
get a lot of use.
Like
many woodworkers and do-it-yourselfers, our workplace is full of handmade tools
and jigs. They have soul that is starkly missing in factory made tools and
accessories; assuming the item can be found for purchase at all, which it often
can’t. It is amazing what even a little bit of handwork on a store bought tool
will do for the feel of an item, both physically and psychologically. The proof
is in their use. And our mini-benches, with or without the bells and whistles,
get a lot of use.
* * * * * *
Copyright
© 2005 by Susan Robishaw