Introduction:
The building of this boat took a little longer than I'd
planned so I didn't get a chance to use it much last fall
(2019). If you got to this page without seeing the boat's
build page you can see all of that here:
![]() .
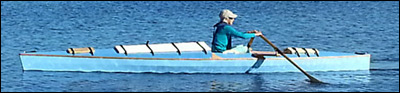
I am back to my original plan of rowing my age in miles some
time around my 76th birthday near the end of August, in 48
hours. Plan B is to do my birthday trip in as short a time
as I can, then next year try to do the same course with, of
course, another mile added at least as quickly as this
year's trip.
.
I am back to my original plan of rowing my age in miles some
time around my 76th birthday near the end of August, in 48
hours. Plan B is to do my birthday trip in as short a time
as I can, then next year try to do the same course with, of
course, another mile added at least as quickly as this
year's trip.
Our long, snowy season is a great time for boat upgrade
planning and this last winter was no exception. In the first
section below I have listed a few of the boat-related pieces
of equipment I have collected and then, following that will
be the details of each of this spring's projects.
 The
Plan:
The
Plan:
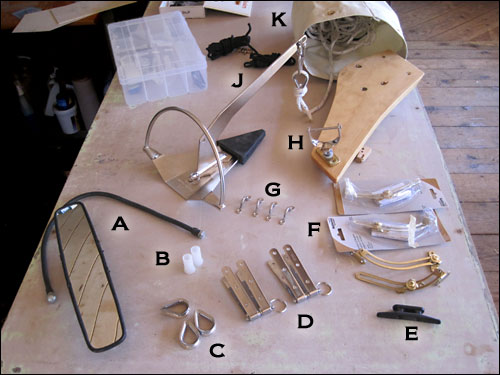
Here
are most of the pieces laid out on the bench in
the boat shop, ready to go.
A - 'Forward-view' mirror and flexible mounting arm
B - Oarlock bushings
C - Anchor rode thimbles
D - Rudder gudgeons & pintles
E - Cleats
F - Cabin hatch support hardware
G - Pad Eyes for attaching gear in cockpit
H - Pin-type oar locks - removable
J - Mantus Dinghy Anchor
K - Nylon anchor rode w/anchor storage bag
______________________________
Proposed Projects:
(A) Mirror: I'll need to make an easily removable mount for the
'Forward view' mirror. I plan on using that sturdy flexible
arm to hold the slightly convex mirror in just the right spot; out of the
way and flexible so it won't be damaged if I whack it with an oar or something.
(B) Oarlock bushings: These new nylon oar lock bushings, like the originals that came with my brass oar sockets, are a bit tight on both the Gayco and new stainless steel pinned oarlock stems. I'll set up a jig on the drill press to ream them out for a snug but not too tight fit. If they are too tight the bushings pull out of the sockets when removing the oars.
(C) Thimbles: I got some nice 316 stainless steel thimbles to fit my 5/16" ropes & lines. My favorite source, Duckworks, didn't stock them so these things are one of the few pieces of equipment I didn't get from them. How much anchor rode is enough? Probably 90% or more of my rowing will be in lakes, bays and rivers that are not over 15 feet deep. A good rule of thumb is that the rode should be maximum depth x 7 in length. So for most of my rowing trips 100 feet would be OK. There are a few spots on my summer trip along the north shore of Lake Michigan where the bay is over 60 feet deep 20 feet from shore. I'll try to avoid that area when the wind is blowing toward the cliffs but will also carry an extra 100' of line and hardware to fasten the two lines together. Also, the bag I made to store the anchor and rode in is set up to be used as a sea anchor. It wouldn't keep one off the rocks indefinitely but might give me some time to get my act together and get off shore or to shallower water.
(J) Anchor: I know, 'D' should have been next but the anchor seems to fit here better. After a lot of research I decided to get a stainless steel Mantus Dinghy Anchor and Duckworks came through in typically great form. They not only had one of these hard to find anchors in stock but it was the even harder to find knock-down version. It easily breaks down into three pieces that can lie flat and take up very little space. It also came with a substantial rubber nose protector - especially important on a skin-on-frame boat.
(K) Anchor rode & bag: I'll get back to the alphabet pretty soon. I designed and sewed up a sturdy synthetic canvas bag sized to store the anchor (assembled) and a couple hundred feet of 5/16" rode. It has four brass grommets around the reinforced top edge and nylon webbing straps that should allow it to be used as a sea anchor. I say 'should' because only an on-water test will show how well it will work. As sea anchors go it is pretty small but then the boat even when fully loaded isn't very heavy and has a relatively low wind profile. I'll give it a test as soon as the ice goes out. Well, I may wait a short while for the water to get closer to 40 degrees. The bag fits inside a three gallon plastic bucket. The whole anchoring setup fits in either the front or aft storage compartment but will most likely be in the rear compartment since it is the easiest to reach from the cockpit.
(D) Rudder gudgeons & pintles: Finally, back to the alphabet! I will be designing and making an aluminum kick-up rudder for use with a future sail rig. It will be controlled by foot pressure and will have an adjustable friction feature that will avoid having to constantly adjust the rudder angle. The stainless steel rudder gudgeon and pintle sets were designed for use on sailing canoes and kayaks and look like a good fit for the vertical stern of this boat. It will take a bit of creative engineering to figure out the toe-operated controls but I look forward to having a rudder for those times when rowing into a quartering headwind.
(E) Cleats: There will be two of these lightweight nylon cleats mounted on the aft bulkhead of the cockpit and two slightly larger cleats on the forward cabin bulkhead. I want multiple options for fastening mooring and anchor lines. These will be through-bolted to the bulkheads with load-spreading plates on the back sides.
(F) Cabin hatch support hardware: This will be one of the first things I'll be working on so that I can keep the cabin hatches open; right now you have to hold onto them so they don't over-stress their long piano hinges. It will be nice to be able have the hatches held in position while designing and constructing a hinged, arched top to go between the two hatches.
(G) Pad eyes:
I will mount several of these little guys
![]() in the cabin and cockpit to have places to hang things like
a glasses case and gloves; stuff I don't want to get lost in
the bottom of the boat or really lost in a capsize. They are
only about 3/4" tall but I will be careful to mount them
where I won't be getting snagged on them when moving about.
in the cabin and cockpit to have places to hang things like
a glasses case and gloves; stuff I don't want to get lost in
the bottom of the boat or really lost in a capsize. They are
only about 3/4" tall but I will be careful to mount them
where I won't be getting snagged on them when moving about.
(H) Oar Locks:
My main oars are 8'-4" long and currently have a set of Gaco
locks on them.
 These well engineered oarlocks are made of polypropylene
with stainless steel shafts. I have extensively modified the
oars to work well with these oarlocks but so far have found
them a bit tiring to use because they take some effort to
keep the oars properly aligned for good rowing efficiency.
I'll continue to work on the Gaco setup but will also be
drilling the oars so I can quickly and easily install a new
set of pinned stainless locks.
These well engineered oarlocks are made of polypropylene
with stainless steel shafts. I have extensively modified the
oars to work well with these oarlocks but so far have found
them a bit tiring to use because they take some effort to
keep the oars properly aligned for good rowing efficiency.
I'll continue to work on the Gaco setup but will also be
drilling the oars so I can quickly and easily install a new
set of pinned stainless locks.![]() The only advantage I see to the Gacos at this time is that
in a strong headwind you can feather (rotate) the oars so
they slip through the wind more easily on the return stroke.
It will only take a couple of minutes to swap out oarlocks
and I like having that option.
The only advantage I see to the Gacos at this time is that
in a strong headwind you can feather (rotate) the oars so
they slip through the wind more easily on the return stroke.
It will only take a couple of minutes to swap out oarlocks
and I like having that option.
That's where I'll be starting this
spring's boatshop projects but there are a few other items
on my to do list:
- Design Bimini (sun shade)
- Slim down and balance oars
- Light for compass (red, for night rowing)
- Install tablet mount (for navigation and tracking apps)
- Test long, 3-piece, kayak paddle (oar backup)
- Capsize & re-entry test
April 10, 2020
What really happened: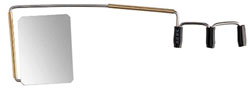
(A) I decided against using that big convex mirror.
Years ago I bought a little bike mirror that fastens to your helmet or
glasses but I found that our rough roads made it unusable. I kept it around for some reason and now I know why. The boat's action on the water is so much smoother that I'll be using that mirror to
see where I'm going.
(B & H) I did ream out the nylon oar lock bushings but not before
discovering that the pins of my new stainless steel oar locks were not
machined the same size. I chucked the larger lock in the drill press
(slow speed), and used a file to 'machine' it down to the same diameter
as the other lock. Then, I reamed the bushings out to fit those pins.
They also fit the Gaco locks well which is good since I still plan on
being able to switch oar locks to fit the rowing conditions (and my
mood).
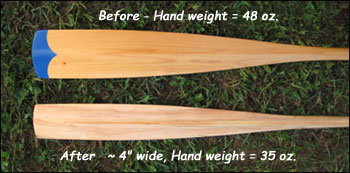
On a related subject, I spent most of a day working my oars down to
lighten them and then balanced them by adding some lead weights inside
the hand-grips. They went from 65 oz. each down to 51 oz. and because
they are balanced feel much lighter in your hand. (Hand weight went down
significantly from 48 oz. to 35 oz.) In the process, I decided to narrow
the blade width down to about 4". I tested them out on the dory and they
feel much nicer. I was a bit concerned that I'd loose power with the
narrower blades but that doesn't seem to have happened.
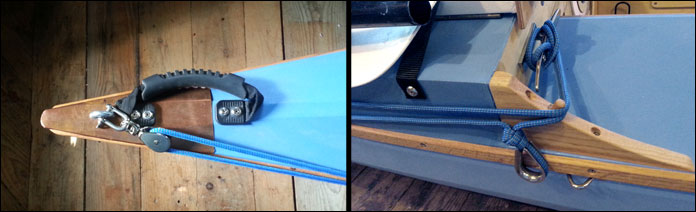
(C, J & K) The Anchoring system is all set to go. I did add an anchor
rigging system on the port side that allows me to deploy the anchor from
the cockpit and then run the anchor rope attachment up to the bow to
keep the boat pointed into the wind and waves when anchored. The idea is
that the anchor is carefully thrown overboard, an appropriate amount of
rope let out and tied to that thimble shown in the right hand photo.
Then the rigging line is uncleated, the thimble is pulled forward to the
bow and the line is tied to the cleat. In the left photo you can see the
copper guard I installed to protect the fabric at the bow from being
chafed by the pulley or line.
(D) I got the idea for this rudder from an on-line
article by Larry Miller and all credit for the design goes to him. I did abandon the
toe-operated idea, for now, in favor of an adjustable push-pull system. I used a
salvaged aluminum 'Curve Ahead'
![]() highway sign for the rudder and kick-up
system and a few pieces of on-hand aluminum angle for the rest of the
rudder head. The pictures show how it looks and functions:
highway sign for the rudder and kick-up
system and a few pieces of on-hand aluminum angle for the rest of the
rudder head. The pictures show how it looks and functions:
Left to right, above: There are two lines running through that aluminum
plate in the middle of the photo; pull the left one to raise the rudder
manually, release it and pull the right hand line to pull the rudder
down. That striped line is mostly bungee material so the rudder can
safely kick up if it hits an obstruction. In the two other photos you
can see the rudder in the down and raised positions. In the upper
position it can act as an 'air rudder' to help keep the boat headed into
a strong wind. The rudder can also be set straight back, out of the wind
and clear of the water. Rudder angle is adjusted with that wood handle
in the left photo. There are a series of holes in the underside of the
handle and a vertical pin in the bottom of the aluminum guide. In use
the handle is lifted a bit and moved forward or back to adjust and lock
the rudder angle.

The rudder head is made from some aluminum angle and a small piece of
the 'curve' sign. The guide on top is positioned directly over the
pintle/pivot so the lift and hold-down functions work well regardless of
rudder angle. A small nylon pulley keeps the raising and lowering action
smooth. I used a stainless steel 5/16" rod-end bearing on the end of the
push pull shaft which is a fiberglass driveway marker.
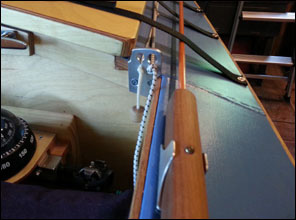
(E) I mounted a cleat on each side of the cabin/cockpit bulkhead and one
on the bulkhead that makes up the aft end of the cockpit. These are 5"
stainless steel cleats and are backed up by aluminum plates using all
stainless hardware. Stainless is non-magnetic and this was particularly important for the aft cleat as
it is mounted only inches above the compass.
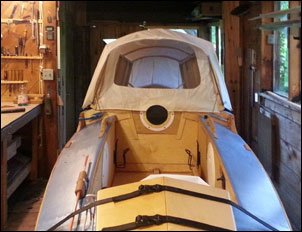
(F & G) After a bit of fiddling the cabin hatch support hardware is
working as planned. I also added a couple of diagonal latches at the bow
end of the hatches to stabilize the lids so they could better support a
cover for the cabin. I mounted three of those little pad eyes just below
the outer rub rail along each side of the cabin. The cabin cover/tent
is secured to them with custom bungees. And here's how the cabin tent
turned out:
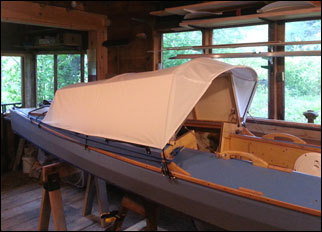
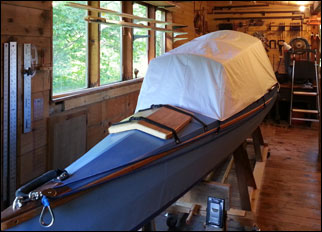
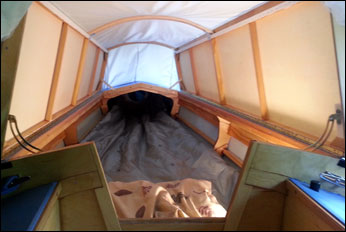
I have timed setup and it takes less than two minutes to set up the
cabin tent and another minute or so to put in the screened and solid end
panels. I have taken a few naps in there and it is very comfortable. I
have a Therm-a-rest RidgeRest pad, a light camping quilt and small
pillow. Very roomy feeling and quite bug-proof. The tent packs up into a
small football-sized bag; the three wood bows nest together in a compact
bundle and fit along one side of the cabin when not in use.
That's about it as of today, June 23, 2020. I finished
refurbishing the trailer yesterday so now we're just waiting
for a break in the weather to get out on the water.
Contact:
Steve Schmeck
steve@manytracks.com
www.ManyTracks.com