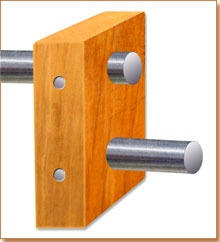
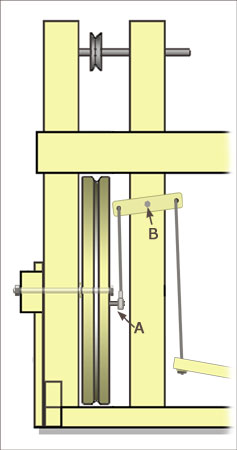
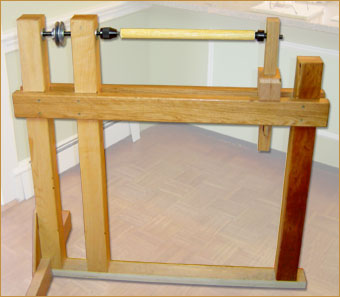
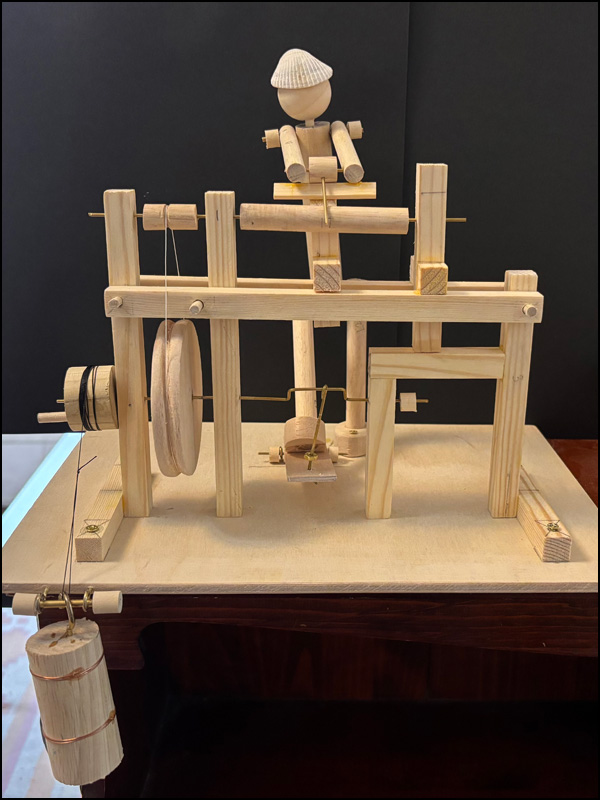
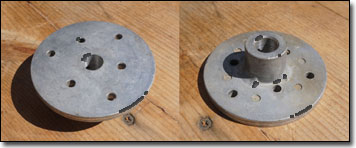
Headstock layout details:
Here is some additional
information on how to set up the headstock. My apologies for not
having covered this very well in the book. The drawing below
shows how I put my lathe's headstock together.
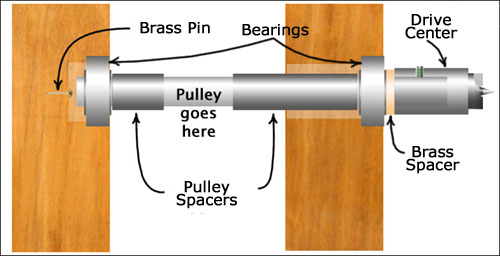
In the book I discuss boring bearing recesses and shaft
clearance holes in the headstock uprights prior to assembly.
Here you can see the specifics of the layout. I have found the
pin on the left to be needed only if there is a lot of end-play
in the shaft. The brass bushing used as a spacer between the
drive center and the bearing on the right pretty well positions
the shaft. I suppose that in heavy use pressure from the
tailstock could overpower the bearings a bit (they aren't
designed for much lateral loading) in which case the pin, and a
dab of grease, would
be a good idea.
The pulley spacers are short sections of
metal tube sized to position the pulley right above the groove
in the flywheel. If your pulley has good set screws these tubes
are not necessary.
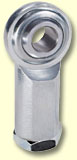
Here is a photo of my old Shopsmith
drive center:
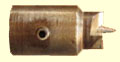
It is held to the drive shaft by that set-screw. You might
want to plan ahead and order this part early since I just
noticed (March, 2017) that it may be a 'special order'
item now. I have not
found any source other than
Shopsmith* for this type of drive center.
My drive shaft
is only 1/2" in diameter and the drive center is designed for a
5/8" shaft so I made up a simple bushing out of a short piece of
PVC plastic pipe:
 The hole in the side is for the set-screw.
Tail
Centers:
I've done a bit of looking for a good tail
center since the tailstock center I used is no longer available
(My Shopsmith is about 65 years old). If I was to go the
simplest route now I'd buy a #2 Morse taper tail center, bore a
hole in the tail stock upright the size of the small end of the
taper and use a rat-tail rasp or tapered reamer to create an
appropriate taper in the hole. This may sound crude but with a
little attention and patience you can get a pretty good fit.
Shopsmith has a couple tail centers listed on that catalog page
(link above) but there are undoubtedly many other sources for
both fixed and live tail centers with tapers. Here's one at
Amazon*.
On a spring
pole lathe that I built 40 or so years ago I made an adjustable
tail center from an old piece of gate/shutter hardware that
looked like this:
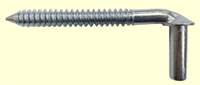
I bored a slightly undersized hole through the tail stock
upright, heated the pintle with a propane torch (holding it in
Vice Grips) and quickly screwed it into the hole. This burned
some decent threads into the hole. While the screw was still
warm I rubbed some bee's wax on it for lubrication. One of the
first turning projects on that lathe was to turn a wood handle
to slip over the 'handle' end of the pintle. I filed a nice,
smooth, bluntish point on the working end of the screw. This
setup worked well for a lot of years.
Turning
bowls & plates:
I'm occasionally asked if this type
of lathe can be used to turn bowls and platters. I have turned
simple bowls up to about 5" in diameter and 1-1/2" deep from
dried cherry and yellow birch. I roughed out the bowls as close
to final size as I could and then, taking very light, slicing
cuts, shaped the outside. For the inside I just used light cuts
with a sharp 3/8" bowl gouge.
The inside middle worked
down quickly but closer to the rim things slowed down quite a
bit. The limiting factors were tool pressure and belt slip. At
these slower speeds it seems like catches are more frequent. On
the other hand, because of the limited torque of the lathe, the
catches tended to just stop the piece instantly. Some catches
were a bit more violent and damaged the piece or at least gave
me rude awakening.
If I was planning on doing much of this kind of work I would
definitely invest in a
Shopsmith aluminum faceplate* 3-3/4" with
5/8" bore. About $26. I have only used homemade faceplates and
paid the price in lack of stability.
Starting with green
wood and working quickly one might be able to turn larger pieces
but I suspect that there might be more of a catching problem.
Using a good faceplate, careful technique and really sharp tools
will help.
Lathe drive center speeds for
various flywheel speeds:
( Based upon 24” diameter flywheel and 2½” spindle pulley )
Flywheel
Speed
(RPM) |
Drive Center
Speed
(RPM) |
|
| 60 |
576 |
| 70 |
672 |
| 80 |
768 |
| 90 |
864 |
| 100 |
960 |
| 110 |
1056 |
| 120 |
1152 |
In normal
operation, whether turning or using an accessory such as a
sanding disk, I seem to pump the treadle somewhere between 80 &
100 times per minute. For some jobs like sharpening a chisel on
a 400-grit hard disk I probably go a little faster as long as
the metal isn't heating up too much.
Practical turning
speed is governed by the mass and diameter of the piece being
turned. You have more latitude with small spindles than with
bowls or other larger pieces. When turning larger diameter
pieces you need to keep the speed up to prevent stalling; at
least when, for instance, working on the rim of a bowl. Pumping
at 120 / minute is two per second and though you won't be doing
it all day, it is very doable for reasonable periods.
Leaf
spring for belt tensioner: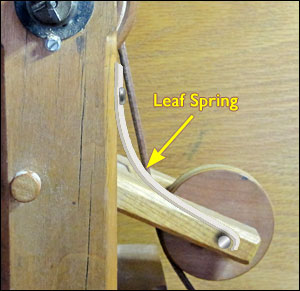
One of the least elegant 'features' of my lathe is the wimpy
coil spring I used to keep downward pressure on the belt
tensioner. Although I have yet to finish implementing this idea,
I have worked it up as a mock-up and it looks like it will work
as well as the old coil spring.
My trial spring was made
from a used hacksaw blade with the teeth ground off. I mounted
it using the hole at one end of the blade and broke the blade
off to the right length. I heated the very end and bent a kind
of hook on the end to help keep the spring in place. I ground
off all the rough corners and sanded off the paint to make it
look a little better. Some rainy day I'll make up an extended
axle for the end of the spring to hook over. Should work OK and
definitely look better.
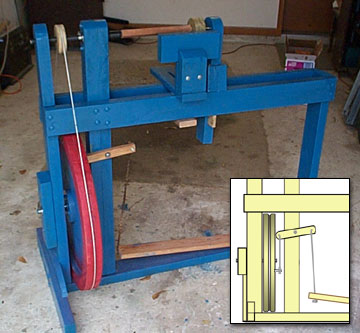
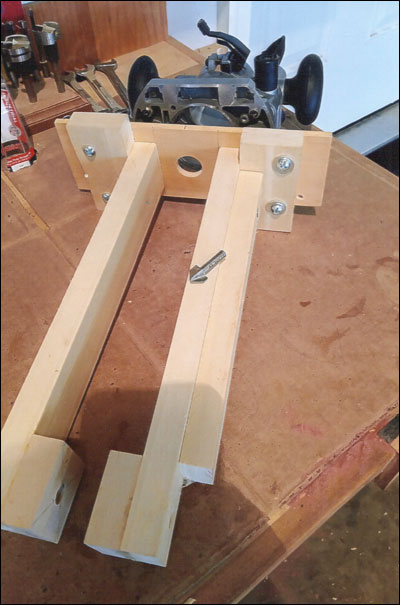
Van Crowe, a builder from West Virginia came
up with this jig for cutting the belt-groove in the perimeter of
his flywheel. The flywheel axle is mounted in those lower holes
such that it is centered below the 'V'-bit in his plunge router.
The router is lowered a little and the flywheel is rotated
slowly by hand. The router is lowered progressively until the
groove is the desired depth. Looks like it would work fine.
Thanks, Van!
And now for something a little different
...
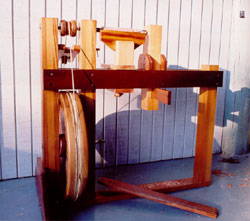
Simple
Spring-Pole Lathe:
Way back in 1985 Sue and I began
attending art fairs selling and demonstrating hand carved spoons
and some wooden flutes I was making at the time. We found that
demonstrating was not only more fun than just selling, it
greatly enhanced our sales.
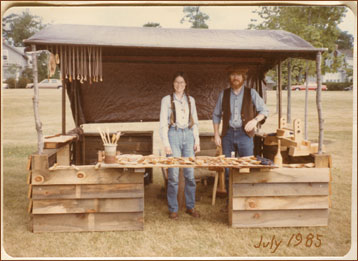
On the right of the photo above, by my elbow, is the
spring pole lathe I used to demonstrate turning cherry flute
blanks.
The lathe was pretty crude but so much fun to use that it
was sometimes hard to stop and pay attention to our customers.
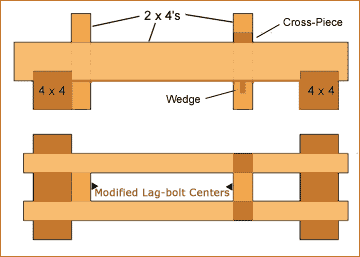
To make it I laid out a couple of 4x4's about 16" long for a
base and notched them to receive the 2x4 'ways'. They ways were
spaced so a headstock (screwed to the left base 4x4) and puppet
would just fit between them. The puppet was notched to accept a
cross-piece that rode on the top of the ways. This thing was
secured to the ways with a mortised, tapered wedge that ran
against the underside of the ways. For centers I had best luck
with short lag bolts that had their heads cut off and ground to
a nice conical point (screwed red hot into a pilot hole with
vise grips). Eventually I updated the center on the right as
shown above.
The whole outfit was bolted to the bench-top
or, when we were demonstrating at art fairs, to the side of our
booth. For a pole, at home, I used steel strapping to mount an
ironwood pole about 2" in diameter at the big end. and maybe 8'
long, to the rafters over and parallel to the bench. In the
booth I cheated and used a couple of non-traditional bungee
cords. I was fortunate to have an old set of Craftsman lathe
tools that worked fine for turning the bored-out flute blanks.
I have made up some pretty simple plans for a spring pole
lathe right here!
Note: Although
I really do like my ancient Shopsmith and it may seem like I'm
pushing their products, I don't have any connection with them.
I hope these
ideas help smooth your lathe construction. These 'updates' will
be incorporated into the next edition of both the e-book and
print versions of the book. Many thanks to those who have
written asking for clarification on some of these issues as your
questions have helped me with these updates.
Steve
* Any product links I've
included are there to help you find what I consider a good lathe
part. I don't make anything from those links.