|
In the spring of 2016 Sue and I built a skin-on-frame kayak for her
use. It was based upon Brian Schulz's F1 design though it was built
using frames and stringers vs. steam-bent ribs. You can check out the
building of that boat
here. |
|
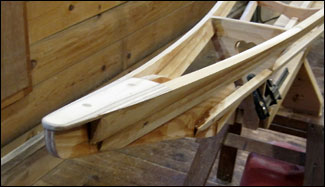
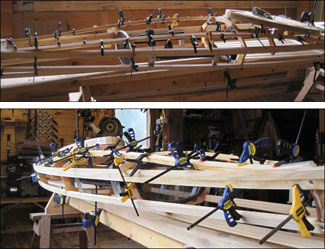
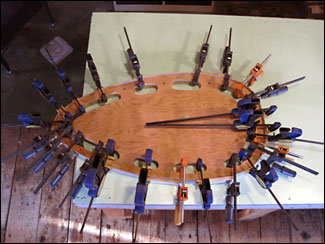
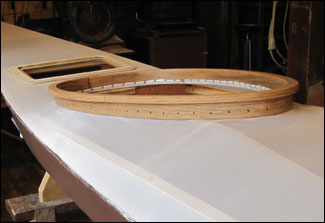
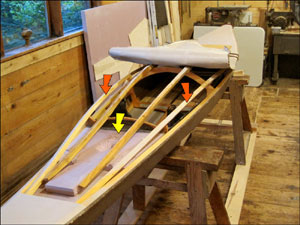
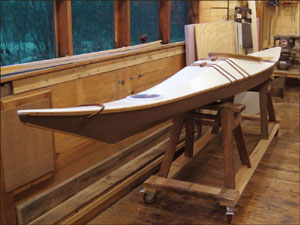
 The project began with cutting out the seven frames using full sized patterns provided with the plans. I was able to slightly modify the gunwales, keel and stringers I had prepared last year when building Sue's kayak. In the photo above you can see the basic frame layout. All those clamps at the bow are 'redirecting' the split gunwales to create the swoop of the shear of the bow. |
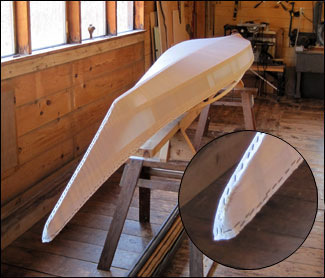
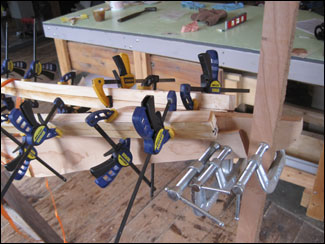 Here is a closer look at that process. The gunwales were split (sawn) 54" back from their tips then bent upward to create the desired 'laminated' curve at the bow. The pine wood we're using is pretty stiff, even at only 5/8" thickness, but this did work as the plans indicated it would with only about an inch or so of spring-back when the epoxy had cured. - March 5, 2017 |
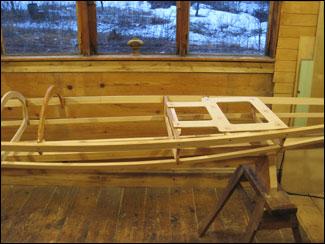
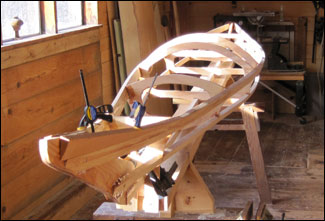 The gunwales and chines are permanently screwed and glued to the stems and frames. I am in the process of adding risers to fill the space between the tops of the gunwales and the top of the bow stem. This is according to the plans and should produce a nice even sweep at the bow. The boat project is on hold awaiting warmer weather. It takes a lot of firewood to bring the shop temperature up from low single digits that are forecast for the next week. The rivers are still pretty hard so that's OK. - March 10, 2017 |
- March 15, 2017 |
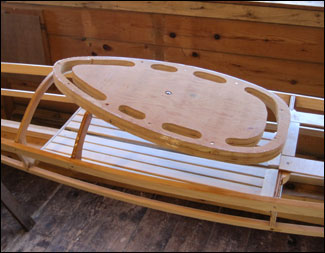
 After the epoxy holding the risers had cured I cut a recess for a small plywood bow plate. This piece is shaped to form a continuous curve with the tops of the risers and gives the bow its shape . |
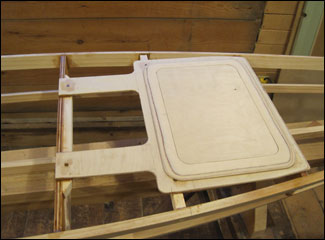
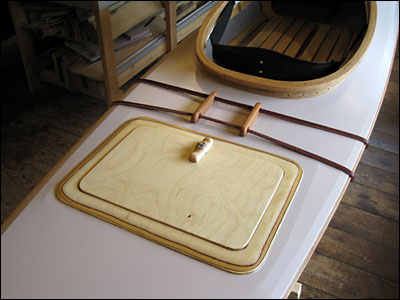
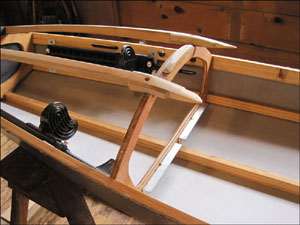
 I decided that it might be a good idea to have at least a little
accessible storage space for things like a jacket, gloves, water bottle
and lunch so I designed this hatch system to replace the aft deck beams.
I added an additional cross piece and then screwed and glued the hatch
plate (above) between the two frames behind the cockpit. |
 |
|
 This assembly is made from 1/4" Baltic birch plywood and adds 28 oz. to the weight of the boat. |
|
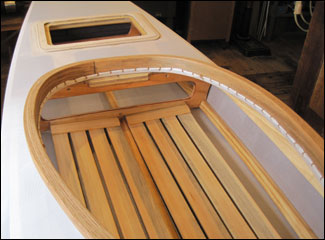
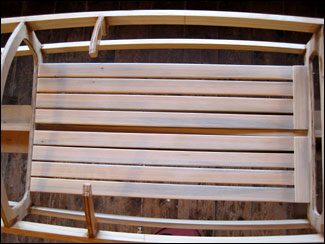 Today's project was to complete the floor (seat). I deviated somewhat from the plans here by choosing to fasten the floor slats into two panels and then fasten them to the frames with simple hidden fasteners.  |
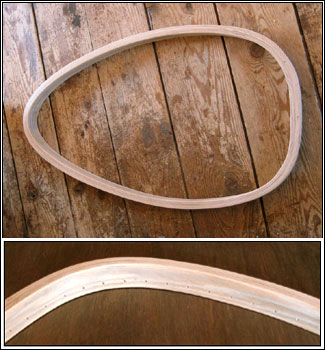
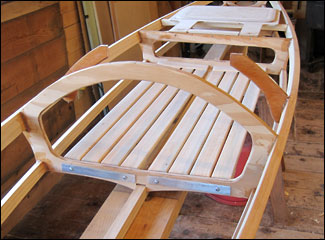 Here's another view of the floor showing Tom Yost-style mounting backup plates. With the floors in I was able to get into the boat for a test fit. For a couple of reasons I decided to go with a larger, more modern style coaming. Most important was that I had a hard time getting into the boat. With the traditional, round coaming you enter the boat by sitting on the back deck and sliding forward until you plop down into the seat. The clearance on the masic was too tight for comfort. Also, I felt that I would have a hard time doing a wet exit through the smaller coaming. |
|
|
|
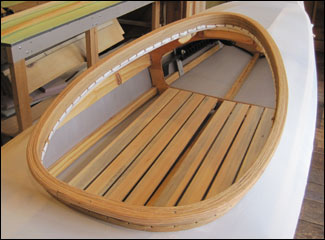
 So, here is the coaming laminating form from Sue's kayak sitting in position - it fits perfectly! I left remnants of the masic to at least temporarily stabilize the coming. - March 20, 2017 |
 Today I cut and fit the flotation foam and generally made a mess of the shop. Cutting and trimming all those 1" thick pieces created lots of little, staticky, obnoxious slivers of foam. An interesting sculptural process reminiscent of some projects in my senior year sculpture class - 50 years ago. - March 24, 2017 |
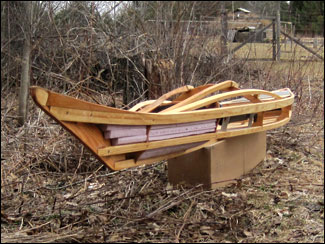
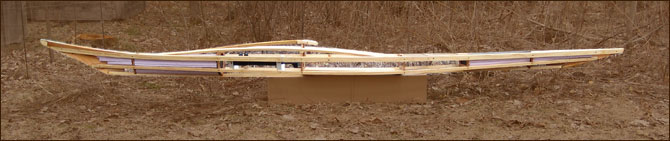
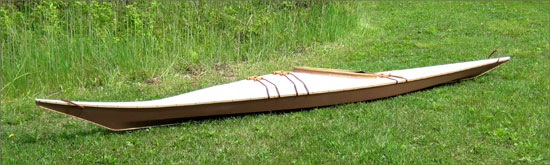
 Here's a view of the frame out 'on the grass'. The next steps are to oil the frame and then permanently glue in the foam. In the photo you can kind of see that I modified the forward deck beams. I cut them in a shallow 'S' curve, to give me a little more toe room and to have the forward ends blend into the sweep of the bow more smoothly. - March 25, 2017 |
|
 Dave Gentry describes this kayak as, "... specifically designed for lighter weight paddlers, and optimized for relaxed use. ... Recommended paddler size: 105 - 180 lbs." I weigh about 140 lbs so fall right in the middle of Dave's design weight. |
What I hadn't considered is that light paddlers might also have smaller feet. My size 10's wouldn't fit under the front deck so I had to make some room for my toes. My solution was to 1) curve the deck beams (above), and 2) add secondary deck beams between the main beams and the gunwales. To make these things look OK I laminated a long curved piece that starts at the frame behind the coaming, swoops around the coaming, over frames #3 and #2 and disappears below the deck fabric before getting to frame #1. The photos on the left show the three 1/4" thick strips being laminated into this weird shaped piece. It looks like I'll have room for my feet at the expense of loosing a bit of the traditional look of the boat. March 29, 2017 |
 |
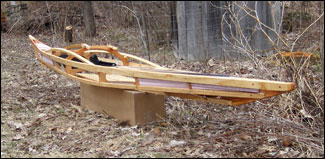 The frame is finished and ready for skinning. Last minute details recently completed: Oiled entire frame with tung oil, final fitting of flotation foam, holes drilled through gunwales for carry loops and cross-lines. April 5, 2017 - One month to get this far. |
 |
|
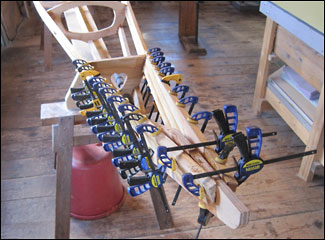
 Clamping again! Here we (this takes the two of us to do well) have just wrapped the first of three laminations of thin oak strips around the coaming form. The strips were soaked (you can see the next strips in the trough beneath the boat, right photo) for several days. Then, with a bit of help from the heat gun, they nicely bend around the form. They will rest like that overnight. |
 Today I also attached the polyester fabric to the bottom of the frame. The technique I've been using is to first stretch the fabric tightly over the frame, end to end, centering it on the keel, then staple 6-8" to the gunwale on one side. I duck under the boat and do the same on the other side, spacing the staples a couple of inches apart. All this, of course while pulling the fabric tightly over the frame. I then go back over the whole thing and pull & staple so that there are no wrinkles in the fabric - staples almost continuous along the gunwales. I'm using a really nice, $25 Surebonder® pneumatic stapler and stainless steel staples. Looking more like a boat. April 8, 2017 |
 Today I skinned the deck and bent the second lamination piece onto the coaming form. We're back to below freezing temperatures so I may wait a couple of days before continuing on the coaming. I'll work inside on the deck line sliders and maybe lay out the paddle on a nice 2x6 we picked up yesterday. April 10, 2017 |
|
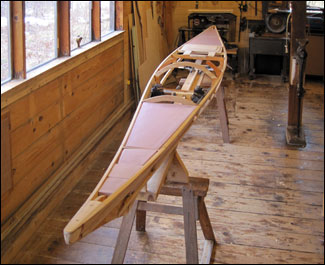
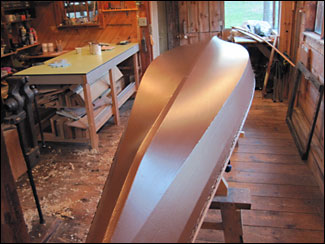
 While waiting for the various steps (bending, gluing, curing) on the coaming laminations I decided to get the first coat of paint on the bottom of the kayak. This first involved varnishing the sides so masking tape would stick to the fabric. With the boat inverted, I masked along a line an inch above the chine and then applied a very thin coat of PL Premium construction adhesive to the whole bottom of the boat. This stuff has to be worked into the weave of the fabric then almost entirely scraped off or it will bubble up and make a real mess. When that coat cured (2 days) I finally applied the first coat of 'Chestnut Brown' Rust-Oleum - a dark milk chocolate color. The plan is to paint the deck light tint of that color. April 11 - 15, 2017 |
|
  |
The coaming is finally done! It would have been a good idea to begin
making the coaming earlier in the building process since there is quite
a bit of down-time in the bending and especially in the laminating. It
is difficult to add more than a couple of laminations (of seven) due
to their tendency to slide around, up and down, when the thickened epoxy
is applied. |
  |
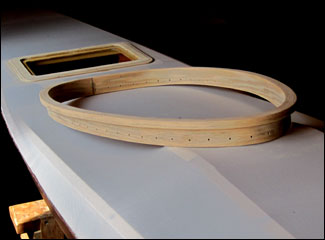
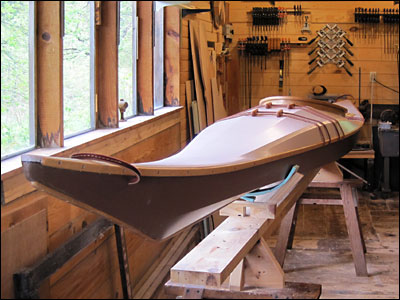
 As you can see I finally got the coaming sewn on the boat. This is an easy bit of work and quite rewarding when it turns out OK. Ready to mask off the coaming and hatch frame then get to work with the paint roller & brush. Just the outside of the boat gets painted; the paint is what keeps the water out. May 5, 2017 Two months so far... |
 (Despite the color in this photo, the boat is really a mocha chocolate brown with as Sue says, a latte deck.) |
I have applied a total three coats of paint to the bottom of
the boat and the weave is well sealed. The bottom looks pretty smooth
and shiny. Next up is to install the bow and stern rub strips that I
soaked and bent to shape awhile ago. These are made from 1/4" x 3/4"
oak 'Screen molding' from the lumber yard. A convenient shape - two
edges rounded, and quite inexpensive as those things go. May 15, 2017 |
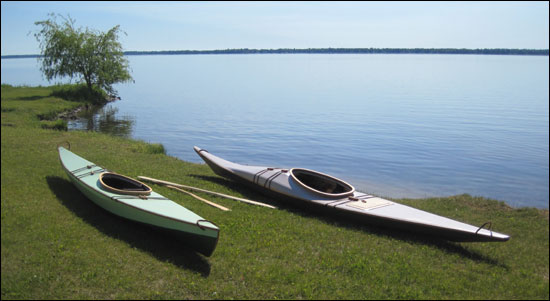
| -- Completed Mobjack Bay Kayak -
May 28, 2017 -- . |
|
 . |
Well, the kayak is finally done and ready
for the water. Today I installed the back band and tether that keeps the
hatch lid from going adrift, the last of the details on my kayak to-do
list. |
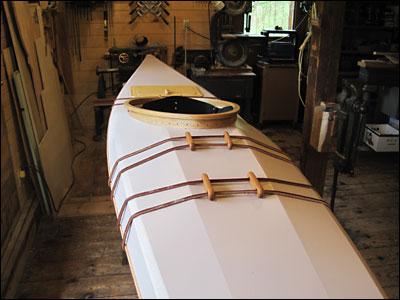 . |
Front deck with two sets of latigo cross lines and black cherry tightening sliders. |
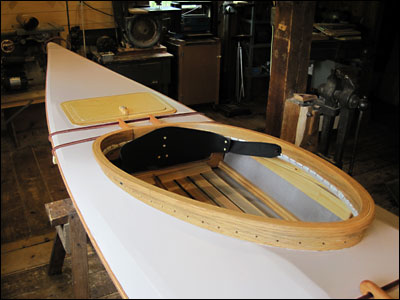 . |
Coaming with minimalist back-band. You can also see a part of the seat area. Padding to be added as needed later. |
 . |
Aft deck with single, stronger, cross lines. One should be able to slip the paddle under these, tighten the sliders and use the paddle to stabilize the boat for re-entry - or to eat lunch, I suppose. |
 . |
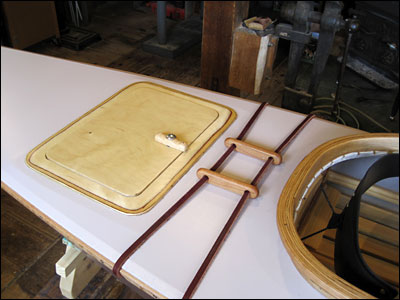
Hatch with lid securely closed. The area below the lid is not watertight - it is open to and theoretically accessible from the cockpit (small opening). Stuff that needs to be kept dry will be put in waterproof dry-bags. |
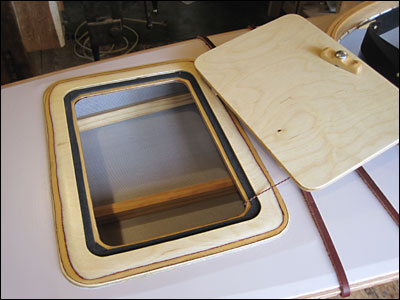 . |
Hatch open. You can see the lanyard (100 lb test) that secures the lid to the boat. Space in there for a jacket, lunch, etc. |
 |
Latigo (waterproof leather) stern carrying handle - a sewn loop that runs through the gunwales. Each cross line and carrying handle is strong enough to carry the boat by. |
 |
|
|
I have not shown a lot of detail on the various steps
while building this kayak. Our two previous boats,
Chamberlain Dory and 'F1 style' Kayak were
documented in more detail so if you wonder "How'd they do that?" check
out those pages. 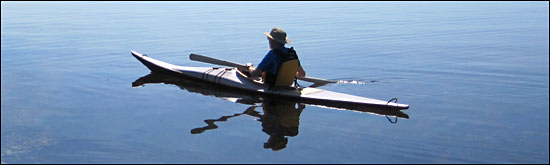 June 11, 2017 and we finally got a chance to try out the new boat at Indian Lake, about 15 minutes from home. As you can see it was pretty calm - perfect day for a first launch. My first impression was that the kayak is very stable. I had to remove the back band in order to get far enough back in the cockpit to get my knees under the front of the coaming but once in and with the foot pedals adjusted it fits me like a glove. The back of my PFD slides down into the cockpit and nicely acts as a back pad - very comfortable. 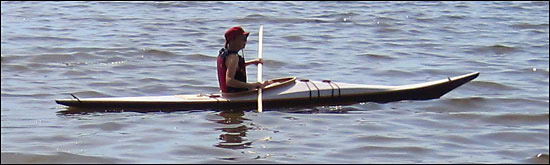 Sue took the boat out a little later and
enjoyed the ride. |
|
|
Fall of 2018
Update: Fixing the bow of the Mobjack Bay |
|
|
|
|
 |
In order to get at those offending stringers I needed to remove the skin from the area of the first bulkhead back to behind the coaming. The oak rub strips came off in one piece which surprised me since they were not only screwed on but glued on with PL Premium building adhesive. I then dug out and pried out a couple hundred staples that held the deck fabric in place. I cut the fabric near frame #1 with a razor knife and kind of rolled the skin right back. Not too surprising, that uncovered a couple of mouse nests (yellow arrow). The orange arrows points to the stringer that are to be removed. |
|
|
|
 |
Cutting the stringers out went well
using a Dremel Multi-Max oscillating tool and a fresh, sharp
blade. A little file work and sanding and you could hardly tell
that the stringers had been there. The front of the coaming
rests on top of those two faired stringer extensions. |
|
|
|
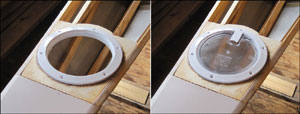 |
I dug out all of the foam between frames 1 & 2 and epoxied in piece of 1/4" Baltic birch plywood as a base for the snap-out round hatch in the photo. There was a slight arch in the plywood so I had to build up a flat area with thickened epoxy for the hatch to mount onto. |
|
|
|
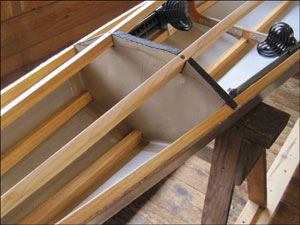 |
Next up was to seal bulkhead #2 to make the storage area waterproof. The panel already had an epoxy reinforced mesh fill that was structurally pretty strong. I cut a piece of heavy duty vinyl material to a shape that fit the bulkhead plus overlaps an inch onto the skin of the hull. The gaps at the top of the panel were filled with rigid high density foam. I did a few tests to see what adhesive that I had on hand bonded best with both the plywood of the bulkhead and the polyester skin and still remained reasonably flexible. I ended up using E6000 Flexible Clear adhesive and it looks like it will work OK for this application. The trick is, I believe, to create a waterproof barrier without also creating any visible or structural hard spots in the fabric. |
|
|
|
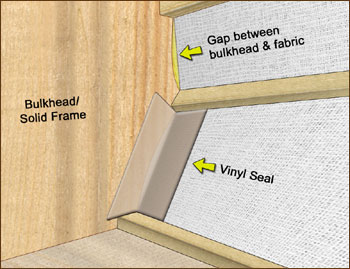 |
Here is a little more detail on how I sealed the bulkhead to the skin so that in the event of a capsize water wouldn't sneak around the edges of the bulkhead and flood the 'flotation chamber'. The illustration shows individual flexible vinyl seals but on this boat the previously open frame was sealed with one larger piece of vinyl. |
|
|
|
 |
I cut the old deck free behind the coaming and re-skinned the deck using some leftover 10 oz. polyester fabric I bought from George Dyson for Sue's Kayak. In the photo you can just make out that I have the fabric stretched very tightly fore and aft. That made it relatively easy to staple the skin to the gunwale - a few staples on one side, then duck under the boat and put in a few more on the other side, over and over. This make a nice, tight wrinkle free skin. I used West System G-Flex 650-8 epoxy to bond the high-stress end seams of the deck over the old skin before releasing the lengthwise tension. This is a toughened epoxy that is not brittle when cured - my new favorite adhesive for these really tough jobs. |
|
|
|
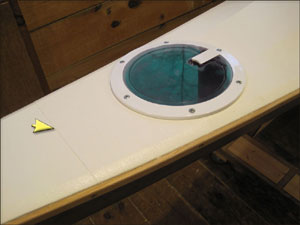 |
Once that epoxy cured for 72 hours (the shop was a bit on the cool side) I ran over the whole skin with a hot iron to even out the tension of the skin and to fuse any loose fibers in the fabric. I rolled on a few coats of Royal 100% Acrylic House & Trim Paint (Ace Hardware) and mounted the hatch. The yellow arrow points to the nearly invisible seam. |
|
|
|
 |
One of the hardest
parts of this job was retying the knots in the latigo
cross-lines. On a couple that I just couldn't reach I used Chris
Cunningham's technique of pulling them tight from the inside and
tapping in small semicircular wedges. The oak rub strips went
back on nicely with the screws going into their original holes.
|