
-- Seat Detail --
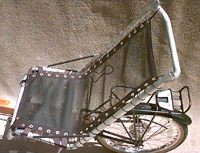
Construction details of the seats used on both 'Woody' & 'TreeBike'
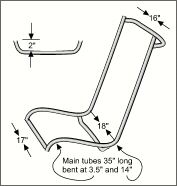 |
The seats on both Woody & TreeBike were constructed of
salvaged 7/8" OD aluminum CB antenna tubing. The main tubes were
cut to 35" and bent on a borrowed, hand operated tubing bender
as shown in the drawing. The front edge was joined by a straight
tube and the other two cross-tubes were bent to allow 2" of
clearance below and on the back of the seat. The dimensions given are for Woody's seat. Sue's is similar but main tubes were bent at 3" and 13". Seat width is 1" narrower all around. |
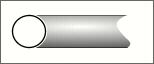 |
I used a 7/8" Milwaukee hole saw to cut the ends of the tubing to nice tight fitting joints. |
If I were to do the job over again I would take the seat parts, assembled in a jig, to someone who does a good job welding aluminum. What I did was solder all of the joints into massive globs and then endlessly grind the mess down toa reasonably smooth joint. There is a fine line between smooth, good looking joints and weak, useless joints. The solder I used is MG Welding Products' 'MG 470", described as a 'Maximum strength self fluxing solder for joining, build-up and hardfacing aluminum'. I believe that the 1/8" diameter rods cost around $35 for two pounds.
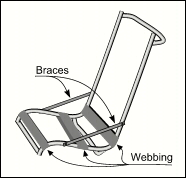 |
I added a couple of aluminum tubing braces after the first test ride. The seat reclined more with each hard pedal stroke due to the weakness of the main tubing. The braces are pop-riveted on and covered with shrink-wrap. As it turns out they give a more secure feeling by providing some lateral support and are not a problem when getting on and off the bike. |
|
|
|
The seat material is nylon mesh and Cordura nylon fabric purchased from an upholstery/tent & awning shop. The mesh was cut to fit inside the frame with 1" space all around. Then 3-1/2" strips of Cordura were folded over the edges of the mesh and sewn on as edge reinforcement. Using a piece of 1/4" steel rod and a propane torch, I heated the rod and melted holes at 2" intervals along both sides. This creates holes that are self-finished and very strong. Finally, 1/4" brass gromets were installed in the holes for further reinforcement. The seat was laced into the frame using some approx. 1/8" diameter shiny polyester cording purchased from a fabric shop. |
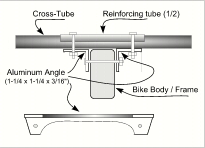 |
The seat mounts to the frame with two pieces of aluminum angle which run between the front and bottom cross-tubes. I cut out a lot of the angle material to reduce weight. Speaking of weight, this seat, complete with mounting as shown and with fabric and lacing weighed in at less than 3 1/2 lbs. |
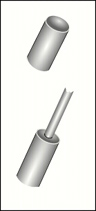 |
Three of the four open ends of tubing were finished by epoxying in short lengths of 3/4" wood dowel then rounding the ends. This was done as a safety measure. While testing Woody I tipped over while hardly moving and 'apple cored' my ankle. Not a pretty sight even today. At left you can see how the top left tube was finished. A longer dowel was first drilled to the size of a light-weight fiberglass sectional tent pole, then glued into the tube like the others. A little sewing of some bright yellow ripstop material and the safety flag was done. These bikes are low and don't present a very large or recognizable picture to car drivers. The flags are something drivers are used to associating with bikes ... and they make me feel a bit more visible. |
Total cost per seat, not counting labor, was less than $35. I hope this information helps you construct your own recumbent bike seat - or decide not to, as the case may be. These seats have worked well for us. If you have any questions or comments please contact me.
{Back to Recumbent Archive}